By Justin Masciangelo, President MMX Powersports
In this first of a two-part tech section I will be touching on a subject that all riders should familiarize themselves with – clutch inspection. The inspection process outlined in this article cannot only help you diagnose your clutch problems but make adjustments to cure the problem – even at the track.
Clutch Issue #1: Stiff or Rough Engagement
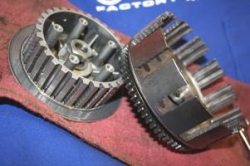
A common complaint amongst many racers is a stiff “notchy” clutch lever or an unpredictable engagement. This is most likely caused by a worn or grooved outer clutch basket. When a clutch  assembly is new and all the components are fitted properly, engagement is smooth and adjustments are easily made at the lever, however as time goes on and hours are logged you’re clutch is taking the brunt of the abuse. The rotational force of the plates slamming against the outer basket upon release can increase clearance and even create grooves that can translate into poor starts, missed shifts or in extreme cases lack of drive. The friction plates typically move in a straight lateral direction within the fingers of the basket, these grooves force the plates to have to jump over the ridge to engage and can also restrict plate movement all together. Consequently this is felt at the lever and throughout the clutch stroke.
Most of the time this can’t be fixed with a simple adjustment. A permanent repair usually requires replacement of the basket and a detailed inspection of all the clutch components as well, as there may be damage to other parts. However if your budget does not allow it, or you need to buy some time, here is a tip that could get you a few more rides!
Remove the clutch plates, inner hub and outer basket assembly, lightly file the thrust face of the basket as shown to smooth out the notches (do not remove excess material this can result in weakening of the basket fingers). Follow by working the area with an emery cloth or Scotch Brite pad to removed any burrs. Clean thoroughly with soap and water and dry, reinstall in reverse order. This will alleviate some of the “notchy” feeling and allow smother transition of the friction plates over the grooves. All in all this is a great tip when you are in need at the track or if you’re trying to just get a few more rides out of the clutch before replacing it.
As always, for more in-depth issues or if you’re not comfortable with disassembling you’re machine, seek out a trusted motorcycle technician for these repairs. In Part 2 of 2 of clutch inspection and repair, we’ll be reviewing in more depth clutch repair and replacement. 